How to Convert Images for Web, Social, and Print: The Complete Format Guide
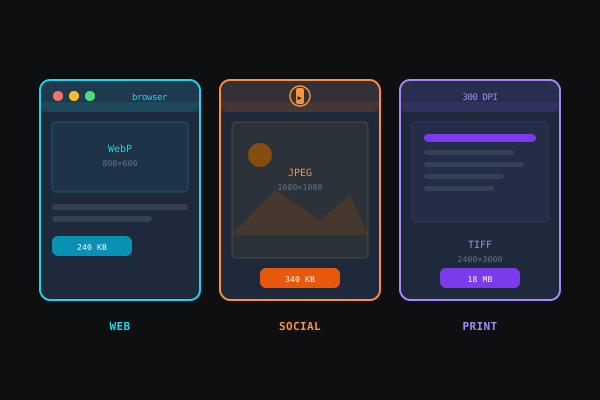
WebP for your website, JPEG for Instagram, PNG for Figma exports, TIFF for the printer. Here's exactly which format to use for every context, and how to convert between them in under a minute.
In this article
The same photograph needs to be four different things depending on where it goes. It needs to be a high-DPI TIFF for the printer, a JPEG for the Instagram upload, a WebP for your website's hero section, and an uncompressed PNG for the Figma handoff. None of those are the same file. Converting between them badly — re-saving a JPEG as another JPEG, uploading a 6MB raw file to Instagram and letting the platform mangle it — costs you quality you cannot get back.
This guide covers the format landscape, the specific requirements for each delivery context, and the conversion steps that preserve quality at every stage.
The Format Landscape
Five formats cover almost every situation you will encounter. Each has a specific strength.
JPEG — Lossy compression optimized for photographs. Extraordinarily efficient: a quality-80 JPEG is about 10% the size of the uncompressed equivalent with no visible quality loss in typical photo content. No transparency support. Every re-save adds more loss. Universal compatibility — every platform on earth reads JPEG.
PNG — Lossless compression. Perfect for graphics with sharp edges: logos, screenshots, UI elements, text. Supports transparency. File sizes for photographs are much larger than JPEG or WebP — a 12-megapixel photo can be 20MB as PNG and under 3MB as JPEG. The right archival format for web graphics.
WebP — Google's modern format, supported in every current browser and most modern platforms. Lossy mode beats JPEG on file size by 25–35% at equivalent quality. Lossless mode beats PNG on size by 20–30%. Supports transparency in both modes. The right default for web publishing in 2026.
GIF — Legacy animated format. In 2026, animated WebP or MP4 is smaller and better quality for every use case GIF covered. Use GIF only when a platform explicitly requires it and provides no better alternative.
TIFF — Uncompressed or losslessly compressed. The professional print standard. File sizes are large by design — TIFF preserves every pixel for reproduction. Not a web format; used exclusively in print production workflows.
Web: WebP Is Now the Default
If you are publishing images to a website in 2026, WebP should be your primary format. The browser support figure is above 96% globally — higher than many web fonts in common use — and the performance advantage is real and measurable.
NoteAlways resize images to the maximum display dimensions before converting to WebP. Serving a 4000 px-wide image on a blog where the column is 760 px wide wastes three-quarters of the file size, regardless of format. Resize first, convert second — the savings multiply.
Why WebP over JPEG for web photographs:
- 25–35% smaller file at equivalent visual quality.
- Translates directly to faster Largest Contentful Paint (LCP), which is the Core Web Vitals metric most likely to hurt your search ranking.
- Supports transparency — you can replace both JPEG and PNG with a single format.
The correct conversion workflow for web:
- Start from the highest-quality source you have — ideally a RAW file or an uncompressed PNG.
- Resize to the maximum display dimensions using our Image Resizer. Serving a 4000px-wide image on a blog where the column is 760px wide wastes three-quarters of the file size.
- Convert to WebP at quality 80 using our Image Converter. For photographs, lossy WebP at quality 80 is the sweet spot. For logos and UI graphics, use lossless WebP.
- Use the
<picture>element in your HTML to serve WebP with a JPEG fallback for any legacy browsers you care about.
Retina and responsive images: For retina (2× density) screens, serve images at 2× the CSS display size. A hero image displayed at 760px should be delivered at 1520px for retina screens. Most modern frameworks (Next.js Image, Gatsby Image, Cloudinary) handle this automatically.
Social Media: Platform-Specific Requirements
Each social platform has upload requirements and re-encodes what you give it. The strategy is to give the platform the best possible source so its encoder has more quality to work with, not to match its output format exactly.
Instagram accepts JPEG and some PNG. It re-encodes everything on upload using its own compression. For best results:
- Square posts: 1080×1080 px, JPEG at quality 90.
- Portrait (4:5): 1080×1350 px, JPEG at quality 90.
- Landscape (1.91:1): 1080×566 px, JPEG at quality 90.
- Stories and Reels: 1080×1920 px, JPEG at quality 90.
Upload at these exact dimensions. If Instagram needs to crop or scale, the re-encoding doubles — first to resize, then again to compress — and the quality degrades visibly.
LinkedIn article images: 1200×628 px (the standard Open Graph size). Profile photos: 400×400 px minimum. Company page cover: 1128×191 px. LinkedIn accepts JPEG and PNG. Use JPEG at quality 90 for photographs; PNG for logos and graphics with transparency.
Twitter/X
In-feed images display at 1200×675 px. Twitter compresses uploads aggressively — give it JPEG at quality 90 at the right dimensions to control the compression outcome. For profile images: 400×400 px. For card images (link previews): 1200×628 px.
Facebook / Open Graph
Open Graph images (link preview thumbnails) should be 1200×628 px. Facebook reads the og:image tag and fetches the image you specify. Serve a JPEG or WebP at that size — WebP works for Open Graph on modern platforms.
Pro tipBatch-convert your social assets. If you have a single photo that needs to appear across Instagram, LinkedIn, and Twitter at different dimensions and crops, convert them all in one session: resize to each platform's spec, export as JPEG, name them by platform. Our [Image Resizer](/image/image-resizer) handles multiple resize targets from a single source file without re-uploading.
Print: TIFF and High-DPI JPEG
Print production operates in a different world from web. Resolution requirements are higher, color spaces are different (CMYK vs. RGB), and the output device is a physical printer rather than a screen.
Resolution: Print requires a minimum of 300 DPI at the final print size. If your image will print at 8×10 inches, it needs to be at least 2400×3000 pixels. Many professional print jobs require 300–400 DPI; billboard printing is an exception where lower DPI is acceptable due to viewing distance.
Format:
- TIFF is the professional standard. It supports lossless compression, multiple color spaces including CMYK, and preserves all the color information a printer needs.
- High-quality JPEG (quality 95+) is acceptable for internal proofs and some professional print services. Avoid re-saving JPEG multiple times before print — each save degrades quality.
- PDF is the document container for multi-page print jobs and layouts. Embed images at 300 DPI within the PDF.
Color space: Screens use RGB (red, green, blue light). Printers use CMYK (cyan, magenta, yellow, black ink). If you are preparing images for professional print, confirm with your print shop whether they need RGB or CMYK. Most modern print shops handle RGB-to-CMYK conversion themselves, but some workflows require you to deliver CMYK. If your tool does not support CMYK export, let the print shop convert from RGB — they have calibrated profiles for their specific equipment.
The Conversion Workflow
From phone or camera RAW to web:
- Export from RAW editor (Lightroom, Capture One, etc.) as TIFF or maximum-quality JPEG.
- Resize to display dimensions in our Image Resizer.
- Convert to WebP at quality 80 in our Image Converter.
From Figma or design tool to web:
- Export as PNG (preserves design quality, handles transparency).
- If photorealistic: convert to WebP lossy at quality 80.
- If UI/graphic: convert to WebP lossless, or keep as PNG if the platform requires it.
From any format to social media:
- Start from the highest-quality source you have.
- Resize to platform-specific dimensions.
- Export as JPEG at quality 90.
From any format to print:
- Verify the pixel dimensions meet 300 DPI at final print size.
- Keep as TIFF or export at JPEG quality 95+.
- Confirm color space requirements with the print shop.
CautionNever re-compress a previously compressed JPEG, especially for print. Each round of lossy encoding compounds the losses from the prior pass. A JPEG re-saved three times can show visible banding and blotchiness even at "high quality" settings. Always work from the original RAW file or an uncompressed PNG master.
Why "Just Upload the Original" Is Wrong
Uploading a 24MB raw photo to Instagram and letting it handle compression is not neutral. Instagram's compression is optimized for its storage costs, not your quality. It will downsample the image to its internal size targets and compress aggressively. You get less control over the output than if you had prepared the file yourself.
The same applies to websites and CDNs that claim to "automatically optimize" images. They do optimize — but their optimization targets are generic, not tuned to your specific content. Resizing to the correct dimensions yourself and converting to WebP yourself gives you a known, inspectable result. Letting the platform handle it gives you whatever the platform decided that day.
Takeaway
Image format selection is not a one-size-fits-all decision. WebP for web, JPEG for social upload sources, TIFF for print, PNG for design handoffs. Convert from the highest-quality source every time and never re-compress a previously compressed file. Each conversion step matters — the difference between a careless upload and a deliberate one is visible to anyone looking at your content on a screen larger than their phone.